I was really excited when I saw the Shotbox, but the $120 price tag kept me from buying it right away. But I still really wanted a good digital copy of my layouts. So I decided I would try to rig something up on my own.
I went to Lowe's this weekend to pick up a hose for our dishwasher that busted and sprayed water all over my kitchen, and for some reason thought to look at the lighting. My thought was I would buy some small LED lights, rig them up in some sort of box, and cut a hole in the top. I found these:

(Click photo for link)
These were $10.98, came in a three pack with batteries and adhesive included. The back twists off to replace the three AAA batteries. I'm sure you could use any type of light, but these worked really well for me. I originally bought two packs, for a total of six. I may return the extra pack, or I may keep them, as they would be handy for all manner of uses.
Today, my daughter and I made a trip to Ikea for some shelves. While I was browsing around, I came across this box:

(Click photo for link)
This is the Lekman storage box, which sells for $12.99. It is 13x14.5x13. It has two solid sides, two sides with nine cut out squares and the bottom is translucent plastic. It comes in five pieces, and snaps together, so it could be disassembled for storage or travel. And it's perfect for photographing layouts.

When turned on its side, a 12 x 12 lays perfectly flat on the bottom. The translucent back lets light in and I affixed two of the LED lights, one on each side. I experimented with different locations and more or less lights, but one light on each side affixed to the top of each side gave the best results.

Placing the lights on the sides, as opposed to the top, avoids glare on your layout and lights the surface evenly.

I placed my iPhone on top and centered my camera lens in the center square and it lined up perfectly. I had to edit the photo to remove the back piece of the box, but otherwise it was perfectly square.
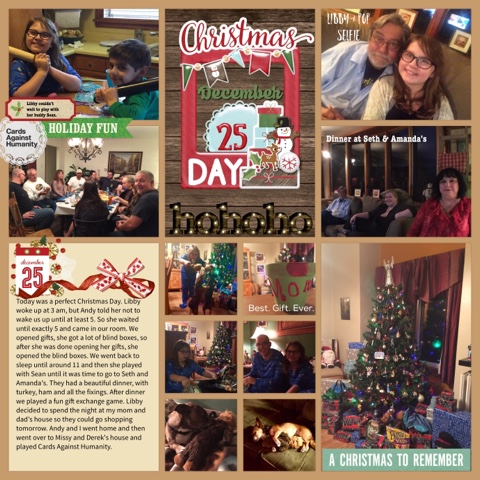
Here are a few layouts I photographed:


I hope you found this useful. Until next time, Happy Scrappin'!!